RSS

Jabra Cruiser 2: No Sound

A few weeks ago, I found that when I turned my Jabra Cruiser 2 on the speaker sounded scratchy like it was going out… over a few days it started to get worse until one day, it stopped making sound.

I called Jabra and they were only too happy to send me a replacement… except I had to have the original receipt. Rats! Could Costco print me another receipt? I thought about this over the next month or so… by then I was sure that the 1 year warranty had expired. Double rats!

I’m a tinkerer, so, I decided to, you know… check it out. I wound up fixing it great! Here’s how I did it. (First, I made sure it was fully charged AND I reset it by turning on and holding down the talk button at the same time for 5 sec. You’ll have to pair your phone with it again). If you still can’t hear it, read on…

1. Remove the rubber pads on the back. Use a small flat head screwdriver to remove them… they’re too hard to remove with your fingernail.

2. Use a #00 phillips head screwdriver to remove the screws underneath. Yeah, this is small, but if you don’t have one of these attachments, it’s worth buying a screwdriver set. #00 is also used on Apple machines, fyi.

3. It won’t come open easily now, you have to pry it open with a small flat head screwdriver (CAREFULLY). For me, it was easier to pry it open from the side with the buttons – use your fingers as much as possible.

4. The problem on mine was the speaker. I found that if I try to play sound through it, like from my iPhone, it won’t make any sound, unless I push down on the center of the speaker once I removed it from its place with two phillips head screws. I suppose spending a lot of time upside down in my car eventually made the center of the speaker come unglued. How much pressure you apply is the trick, however. Too much and no sound, too little and the sound is rough and is too distorted.

5. I used my wife‘s crafting supplies (she was really tickled I was using her stuff to fix something of mine). I used really small buttons that were 2mm in thickness. I used two of them with two glue dots. I stacked and glued these one top of each other and directly on the center of the speaker.

6. Replace the speaker in its place and screw down. Test by turning on. It will tell you it’s connected. Listen for the sound. It should be clear and not static-y. If it is or something else is not right, adjust the thickness until you get the right mix… the 2mm buttons with the tiny glue dots worked for me.

7. When you get the sound right, screw everything back on in reverse and Enjoy!
 
Comments Off on Jabra Cruiser 2: No Sound

Posted by on January 7, 2012 in Cruiser2, Jabra, tink


OS X Lion (10.7) VMware, Bootcamp

VMWare error

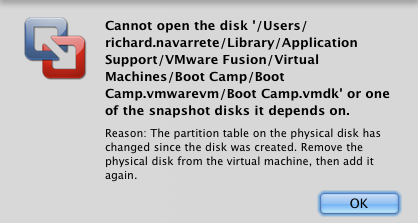
After installing OS X Lion, I tried to run Windows Bootcamp through VMware (3.1.3) and got this error:

Cannot open the disk ‘…Library/Application Support/VMware Fusion/Virtual Machines/Boot Camp/Boot Camp.vmwarevm/Boot Camp.vmdk’ or one of the snapshot disks it depends on.
Reason: The partition table on the physical disk has changed since the disk was created. Remove the physical disk from the virtual machine, then add it again.

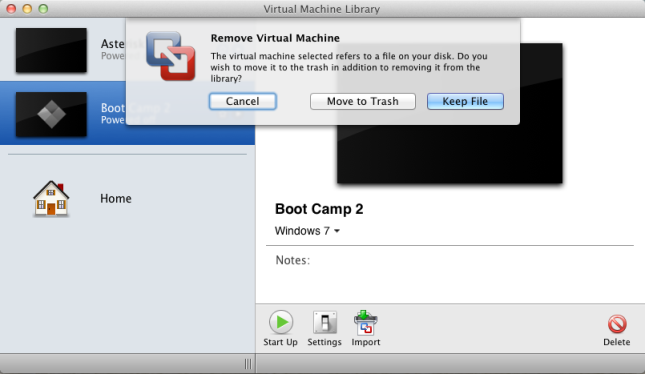
This can sound misleading. Delete Boot Camp from your Virtual Library, but Keep File.
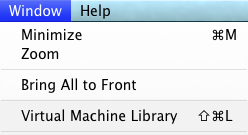
Shift+Cmd+L
launch Virtual Library

Select Boot Camp, hit Delete (or fn+Backspace or fn+Delete). Keep File.
remove

Then, click on “Run Windows from your Boot Camp partition.”
VMware will then prepare your Boot Camp file again.
getting started

After this, you should be all set. Don’t disturb it while it’s doing this… it should go right into your VM.

 
2 Comments

Posted by on July 25, 2011 in Boot Camp, OS X, VMware, Windows


[BUG] Segmentation fault ruby 1.8.7 (2011-06-30 patchlevel 352) [i686-darwin11.0.0]

RVM
OS X Lion (10.7)


:; gem update --system
Updating RubyGems
~/.rvm/rubies/ruby-1.8.7-head/lib/ruby/1.8/timeout.rb:60: [BUG] Segmentation fault ruby 1.8.7 (2011-06-30 patchlevel 352) [i686-darwin11.0.0]

The problem here is that ruby doesn’t like the new llvm-gcc-4.2 compiler.


:; ll /usr/bin/gcc*
lrwxr-xr-x 1 root wheel 12 Jul 25 12:14 /usr/bin/gcc -> llvm-gcc-4.2
-rwxr-xr-x 1 root wheel 113024 May 15 23:37 /usr/bin/gcc-4.2

So, uninstall this ruby and recompile using the old gcc-4.2 compiler.


rvm uninstall 1.8.7 && CC=/usr/bin/gcc-4.2 rvm install 1.8.7

Since llvm is the default compiler, you’re going to see some grumblings in the ruby community, and as someone told me, in installing Ruby Enterprise Edition.

 
3 Comments

Posted by on July 25, 2011 in Lion, OS X, Ruby


Tags:

Xcode 4.1 for Lion developer install didn’t finish?

I downloaded Xcode 4.1 for lion (xcode_4.1_for_lion.dmg) from the Apple Developer site instead of installing it through the App Store. (because we want to download it once, burn it, and install from disk instead of killing our network bandwidth).

Problem: It appeared to run correctly, but then nothing was available. If I tried to re-run it, it wouldn’t let me pick a drive because it said it was already installed. Looking at it from the app store, it would not recognize the install.

Solution: Go into your Applications folder and look for “Install Xcode.” Why in the world would it just install the installer and not tell you to go run it is beyond me. It hasn’t been done like this before… why assume people would know what to do next after the install would say it’s done.

 
Leave a comment

Posted by on July 25, 2011 in Lion, OS X, Xcode


Tags:

Samsung Blu-ray player network woes and solution!

So, we got this Samsung Blu-ray player that also does Netflix, Blockbuster, Pandora, etc. But of course, it needs a network connection.

If you don’t have a LAN cable to plug in (we didn’t), then you have to buy Samsung’s ~$80 wireless network adaptor. Reportedly, it was originally on sale for $35, and is the same hardware I believe, but, they probably discovered they could charge more. I understand their position on this. There are lots of network adaptors out there, they want one that already has the drivers on it because the player and TV don’t act like a computer and can download / install drivers. However, they could have allowed you to connect a computer to it to download the needed drivers, but whatever. Their product, their choice.

Anyway, we looked quite a bit for a USB adaptor and ways to resolve this without having to shell out $80 on top of the not-so-cheap player already. I even considered dropping a LAN cable in the wall.

Anyway, you want to hear about the solution. As it turns out we have AT&T Uverse and their Motorola digital “STB” (set top box). I was curious, if the LAN port on the back of the STB is not being used to feed it connection and using a coax cable instead, would the LAN port (RJ-45) share its connection?

I grabbed a short Cat 5 cable and tried it. I went to the Menu > Setup > Network screen on the player and changed it from “Wireless” to “Cable.” The next thing I saw was, “There’s a firmware update would you like to download it?” Heck yes I would. I tried it, and it started downloading! My wife and I high-fived and will soon be watching movies from Netflix streaming.

Cheers!

 
1 Comment

Posted by on February 27, 2010 in Uncategorized


YourTable.reset_column_information

Rails Migration: Make Database Changes Take Place Before Inserting / Updating Records

Let’s say you have a table to create, and start using it right away, in the same script. If you try to use it right away, it will error out as the table doesn’t exist yet.

class CreateJobLevels type)
end
end

def self.down
drop_table :job_levels
end
end

You need to use: reset_column_information

class CreateJobLevels < ActiveRecord::Migration
def self.up
create_table :job_levels do |t|
t.integer :id
t.string :name

t.timestamps
end

JobLevel.reset_column_information
%w{assistant executive manager director}.each do |type|
JobLevel.create(:name => type)
end
end

def self.down
drop_table :job_levels
end
end

 
Leave a comment

Posted by on November 17, 2009 in Uncategorized


undefined method `set_cookie’ 2.3.3

If you’re using “Tamper-proof cookies” like I am following this tutorial,
and recently moved to rails 2.3.3, you may be getting this error:

NoMethodError (undefined method `set_cookie’ for #):

It actually isn’t so much to do with Tamper-proof cookies, as it is that set_cookie has been deprecated in favor or http_only=.

So, if you’re having this issue, open lib/tamper_proof_cookie_jar.rb and search for “set_cookie” (should be line 38).

replace with this:

http_only=options

Or, anywhere you were using set_cookie, use http_only= instead.

Restart your app server (apache, mod_rails, mongrel…) and it should work for you now.

 
Leave a comment

Posted by on October 14, 2009 in Rails, Ruby


Tags: , , ,

Snow Leopard Install, Ruby on Rails MySQL dev machine

Here are some helpful notes if you’re upgrading to Snow Leopard (SL), and you do Ruby on Rails / MySQL development.

From a dev perspective, there are a number of things that changed with the update to Leopard.

On the Snow Leopard DVD, under “Optional Installs”, install “Xcode.mpkg”. Use all default options.

If you were using MacPorts,it will need to be updated.
Install the latest for SL (1.8.0): http://www.macports.org/install.php
Then, follow this guide to update MacPorts – I suggest doing the manual method to make sure you don’t install stuff you don’t really need. I installed coreutils, and it installed pretty much everything else I needed. If you’re running MySQL through MacPorts, don’t add it back. You’ll be guided by the Ruby on Rails guide to install the 64-bit version next.
The user will probably want wget… installing that gets you openssl, zlib.
http://trac.macports.org/wiki/Migration

Ruby on Rails__
This is an excellent guide, do follow this:
http://weblog.rubyonrails.org/2009/8/30/upgrading-to-snow-leopard Before you read this post and give up, look up your errors in the comments. I had 2 or 3 issues and what do you know? Others had the same issues, I followed a few of the comments where people address others’ issues and viola… working nicely now. Another tip for MySQL: When you install MySQL from mysql.org, be sure to pick the right one.. I kept getting the PowerPC one because it was at the end and had a “64” on it… I realized I needed the other one.

This should get you through most of the changes for Ruby on Rails, and a good start on developer machines in general.

Post any questions you have.

Cheers,
Richard

 
1 Comment

Posted by on September 26, 2009 in Rails


Tags: , , , ,

64-bit OS X Snow Leopard defaults to 32-bit kernel

Why?
It defaults to the 32-bit kernel on bootup because not all software you may have may be compiled / designed for 64-bit. Moving from 32 to 64 is a gradual process. 64-bit applications can still take advantage of being 64-bit and using multiple cores, but the kernel itself is still 32-bit by default. Only Snow Leopard Xserve boots into 64-bit kernel by default.

How do you change this?
If you have a machine capable of 64-bit processing, and you’re bold enough to go 64 only, hold down 6 and 4 on boot up. It will make the machine boot up in 64-bit kernel mode – but be ready for 32-bit applications to break.

Here’s how you find out if you’re machine is capable of 64-bit processing:
http://support.apple.com/kb/HT3696

 
Leave a comment

Posted by on September 11, 2009 in Uncategorized


Tags: , , , , ,

Snow Leopard upgrade, Exchange 2007, PlugSuit, VPN

The main reason for me to upgrade is to start using Mail and iCal and leave the daily torture of using Entourage.

Mail and iCal work great. I had a little tweaking to do to make it check Exchange mail through our external URL (webmail). Just had to use the full UPN (UserPrincipalName) for the username, AD password, and the external URL for both internal and external servers.

The PlugSuit is incompatible (particularly with Quicktime I think). Here is how you disable it (you might have to enable and then disable it for the disabling to take).

When trying to start VPN, I got the horrible CiscoVPN Error 51 I complained and solved here.

But this time, I couldn’t fix it. It seems the CiscoVPN folder I referenced was removed. After some investigation, I found that Apple has included VPN capabilities into the OS. You just go to your System Preferences, Network, and hit the + to add a new network interface, select VPN. Then select whatever VPN parameters you need to – check with your pleasant and always helpful IT Admin for the params.

Cheers,
R

 
2 Comments

Posted by on September 10, 2009 in Uncategorized


Tags: , , , , , , ,